Sheetrock Installation and Repair Service Contractor in Westminster, CO
What does a drywall company do? It’s something we get asked often. Most people are astonished to learn that it’s not as simple as putting up a sheet of gypsum board and calling it a day. We’re so proud of our team and skill level because we can handle repairs, install new sheetrock, and help homeowners with their renovations!
Most people don’t realize what’s involved when fixing small holes and dents in drywall or hanging it. Today, you will learn more about our services. It’s the easiest way to determine if we’re the most qualified contractor for the job!
We offer many drywall services in Westminster, Colorado and aren’t limited to repairs and installations. Our goal is to showcase our skills to our current clients to attract new customers.
Are you planning a renovation or a new build? You should always work with a professional, and Allied Drywall Westminster has sheetrock contractors available to help. Please fill out our free instant quote form on the website or call us directly to get started on your next project!

Drywall Installation
Did you know that drywall is the most important material that goes into your home? The crazy thing is you don’t even see it if the contractor does the sheetrock installation correctly!
Overall, drywall installation is essential for a new build and requires more work than most people realize.
Installing drywall starts with preparing the area, and we do that by covering your electrical and plumbing wires and measuring the space. Next, we cut the sheetrock to fit and hang it with screws. Finally, we check all the walls and apply your preferred finishing level, which we discuss below.
Most people think they can install drywall themselves. Many tutorials online showcase the process, but it’s usually better to call us to do the work for you. While the explanation above seems simple enough, it takes a lot of skill to make it look good!
Our team understands the process of drywall installation near Westminster, and it can take time. Usually, we finish a project in a day or so, but it depends on your home and requirements. Hanging sheetrock in an entire house generally takes longer than adding gypsum board to one room or making repairs.
Once it is hung correctly, we then add the finishing touches. That can take a few days of applying tape and waiting for the mud to dry before painting or installing wallpaper.
As you can see, your drywall contractor does so much more than simply screw drywall to the wall. Let’s go in-depth to see the process step-by-step to understand things better!
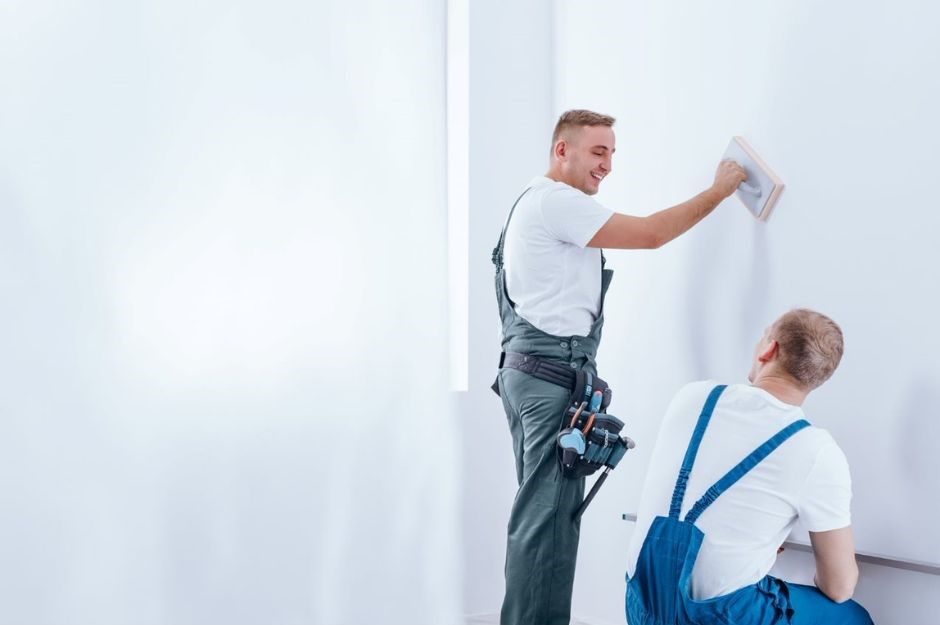
Mudding Drywall
Gypsum board comes in sheets, so we often cut them to size, focusing on the ceiling. Though we try to get things as close to each other as possible, there are always gaps. Therefore, we use drywall joint compound to fill those in and keep things even.
The process involves mudding drywall sufficiently, which is a special paste. It’s all part of our finishing process and creates a smooth surface for paint.
Generally, the drywall paste is the glue holding the sheetrock sheets together. However, we also use that to smooth over the seams, joints, tape, and screws.
Most people like the appearance it gives, but there’s more to it than aesthetics. Drywall mudding offers more structural support to the area and prevents creases and joints.
There are two primary sheetrock mud types:
- Powdered and Hot Mud – We typically mix the powdered mud with water before applying it to the sheetrock. It often sets quickly to help streamline the process, so we must work fast. However, it’s excellent and ensures that we mud drywall corners efficiently toward the end of the process.
- Premixed Mud – This comes already premixed with water, and we use it right out of the container. However, it doesn’t dry as quickly. Generally, we like it for coatings and to put over the tape, though it can cause delays. Our team is skilled enough to understand how soon we need to apply it so that it’s dried out and ready for the next step.
We also use different tools to mud up the sheetrock, such as knives, pans, hawks, and trowels.
Beginners tend to use pans and knives, but our team is skilled enough to work with hawks and trowels, which streamlines the application process. Regardless, we have all the tools available so that we can deal with any situation. Being prepared is our goal!
Taping Drywall
We’ve talked about drywall taping a little earlier, and you may wonder what that entails. It’s an excellent way to cover the joints and seams between the panels of sheetrock to give you a smoother and flawless finish. It’s a paper-based tape that feels similar to the gypsum board and comes in a roll shape. Often, we utilize automatic tools but can work by hand, too.
To use it, we fill in the drywall seams and gaps with joint compound (mud), spreading it as thinly and as evenly as possible. That’s where the trowels, hawks, and other tools come into play. Then, we smooth our spackle tape over that. As mud seeps out from underneath, we feather it onto the sheetrock to make it look better.
Taping drywall is a crucial step because it creates a strong bond between the sheetrock sheets. If you do it correctly, it’s hard to see where a panel ends or begins. We also use the tape for drywall joints so that you don’t notice the shift from the wall to the ceiling.
Many DIY homeowners don’t realize the benefit of taping drywall ceiling joints, but you must do so to get that smooth finish. You will see all the mud and tape, but there are no dents or lumps when you run your hand over it all.
Floating Drywall
What is the purpose of drywall floating? Many people ask us this, and it’s an excellent technique for many situations and homes.
Generally, we hang sheetrock on the wall or ceiling, taping the joints to hide the join. That’s the taping and mudding processes we discussed earlier! However, floating drywall is what we do after applying the tape and another layer of mud to smooth out those joints. We don’t always have to do this, but our team knows when it’s required for the most professional results.
Most homeowners prefer the floated finish this extra step brings. While the tape we use is strong, it does flake off over time, making the wallpaper or paint appear to peel away.
Likewise, we might feel that floating a wall is required when the walls don’t sit on the home’s foundation. In some situations, there’s a gap between the walls and flooring. It could lead to issues later and looks unsightly.
Floating sheetrock prevents structural issues and cracks in the drywall. Have you lived in a home with sticking windows and doors? The installer probably didn’t take this step and should’ve done so!
Does every situation require us to float drywall? No. It depends on the finish you prefer and the type of gypsum board you utilize. However, we generally recommend it for homes that have basements.
We realize the process is complicated, so don’t hesitate to ask questions. Our team can check the property to see what you need before starting any work, and that’s the perfect time to get answers!
Drywall Finishing
Did you know there that are different options for finishing drywall? Here’s a quick breakdown of the levels to help you understand what we provide:
- Level 0 – We don’t do any drywall finishing at this level. You see the sheetrock and joint fasteners. Typically, we leave it like this when you’re unsure of the texture or decoration you want, but it also works well in temporary spaces.
- Level 1 – We embed drywall tape into the mud, but that’s all. This often works well in attics and service entrances.
- Level 2 – During this stage of finishing sheetrock, we will apply a thin coating of mud over the drywall tape and cover up the fastener heads. It works well when you’re adding tiles.
- Level 3 – This level of finished drywall requires a coat of mud over the tape and screws. It does well for walls that will have a heavy texture or in commercial-grade projects.
- Level 4 – Most homeowners prefer this option for finalizing drywall. It works in many residential settings when you’re applying flat paint, semi-gloss paint, or a light texture. We simply apply one more coating of mud to the tape and screws and then sand it all down to be smooth.
- Level 5 – Finishing drywall corners often requires this level. It simply adds one more coating of sheetrock mud to the surface. Plus, it gives you the smoothest result, and you don’t see any issues in any lighting conditions. If you’re using high-gloss paint, you probably want this option!
Drywall Repair
Homeowners might require drywall repair for many reasons. Sheetrock is an excellent product, but it’s not perfect and can get damaged. Generally, it’s strong enough for routine abuse and is easy to fix, though.
Here are a few reasons you may need drywall hole repair:
- Foundational Issues – A house can shift for any reason, and that can cause rigid surfaces to crack. Therefore, you may notice problems, and it could be from a deeper issue. Our team focuses on repairing drywall, but you can call us for an inspection. If we see a foundation concern, we will let you know so that you can call a professional to fix the problem.
- Water Damage – Water can easily soak into the sheetrock and cause mold or mildew. We can help you with your wall repair by removing the drywall at the water level and replacing it with new sheetrock.
- Horseplay and Bumps – It’s easy to put a hole in your drywall or dent it while moving furniture. Pets and children might also give the sheetrock more abuse daily.
We’re here to assist with your drywall patch repair so that things are easier for you. However, we recommend that you call us the moment you notice a hole or problem. That prevents more issues later!
Drywall Removal
When do you need to think about drywall removal? It’s a question many homeowners have because sheetrock is designed to stay in place and protect your home. We wanted to discuss this service and give you a few ideas because it’s something we offer:
- Remove Drywall Ceiling – You might have to remove part of your ceiling for different reasons. For example, the roof might have leaked and damaged it, or the sheetrock might now sag for some reason. We can take out the old gypsum board, adding new sheets to fix the problem.
- Damages – You might require drywall extraction when there’s extensive damage to the sheetrock. We do patch holes and offer that service, but it works better for small openings that are less than 5 inches wide. Discoloration and deterioration might not be fixable, so we may have to remove the old pieces and add new ones.
- Upgrading the Layout – You may decide to request wall demolition to open up the spaces of your home. Many homeowners want a bigger bedroom or prefer a flowing floor plan between the living room and kitchen. We can help you tackle this type of project and work with construction crews and other teams.
- Flooded Basements – When water comes into the finished basement, you will likely have to remove pieces of drywall so that the contractor can make repairs. They have to check the foundation and determine the issue, seeing the whole picture.
As you can see, there are many reasons you might require sheetrock removal. We can help you determine if this service is necessary.
Wall Framing
It’s generally difficult to avoid wall framing when taking on a home remodeling project. We can help you remove the wall or add something to it!
Drywall consists of rigid boards to form the walls of the home. It’s generally ½-inch thick and gets screwed or nailed to the wall studs. Typically, there’s no insulation for interior wall framing since it’s installed on the outside walls where cold and heat sneak into the house.
When framing interior walls, we usually deal with window and door headers. They are horizontal, running across the top of your entryways, windows, and doors, and are important. In fact, they support the material’s weight instead of using vertical studs.
The stud wall is crucial for the hanging process. In fact, we can’t build a wall without it, and you need the wooden slats around the room to put up drywall. Most people only see the finished results where the sheetrock is hung.
Framing walls is an important part of the process to make sure that your drywall stays in place! You want it to last as long as possible, and our team does things correctly to ensure that it works for you!
Wall Texture
During our many years in service, we’ve realized that homeowners dislike looking at four white walls all the time. Wall texture can help you create something personalized and unique to your situation. While some people want to take on DIY projects, this isn’t the time to do so. It generally looks amateurish and might not last as long. Instead, it’s best to call a professional!
Do you want a textured wall? Call us for service because we have the experience and tools needed to do the job well and are highly dependable!
Let’s take a look at the most popular wall texture types to get an idea of what people prefer in their homes:
- Knockdown – This technique is popular because it looks like stucco. It’s similar to the orange peel method we discuss below, though it involves one more step.
- Orange Peel – Have you ever really looked at an orange? You might have noticed the tiny little dimples or dots. That’s how your wall looks when you choose this texture, and it’s quite trendy.
- Popcorn – The popcorn ceiling was the most popular of wall textures back in the 1970s. It easily hid imperfections and absorbed sound between the floors and walls efficiently. Most people liked it because it was inexpensive to do, but the trend is no longer in style. Plus, installers often used asbestos to create the bumps, and it’s now known to be highly dangerous. We can help you update or remove it!
- Comb – This wall texture design requires us to make various lines and shapes in the mud. Many homeowners like it, and it’s simple to do. Plus, it’s aesthetically pleasing, and you can customize it to your liking.
Popcorn Ceiling Removal
Many homes featured the popcorn ceiling texture in the ‘70s and ‘80s. It was actually the most popular because it hid all those tiny imperfections, but it’s definitely not in style anymore. If you have it in your house and are tired of it, we can help you cover popcorn ceiling issues now.
Most people request popcorn ceiling removal for different reasons, such as:
- Better Paint Results – Many people want a smooth surface so that they can paint the ceiling and walls. You may choose any color you want, but it’s easier to get uniform results without that annoying popcorn texture.
- Update Your Look – Popcorn textures are now outdated. Some people might put in a lower bid on the house when you sell or avoid it at all costs because they’re afraid it contains asbestos. Therefore, it’s best to remove it before selling.
- No “Snow” – The popcorn effect doesn’t last forever. You may not mind it, but you still need popcorn ceiling repair to prevent bits of it from falling in your hair or food. You can also call us for removal!
- Maintenance – The rough texture or “bumps” that create the popcorn effect also accumulate dust and cobwebs. It’s often hard to clean, and homeowners dislike that. Removing a popcorn ceiling is generally the best thing to do, and you might also improve air quality in the house!
- Asbestos – Many homes have to deal with the threat of popcorn ceiling asbestos. Installers used it all the time because it was cheap, but it is seriously damaging to your health!
Ceiling Repair
It’s tempting to put off ceiling crack repair, but it’s best not to do this. Here’s why:
- Noise Protection – Repairing stipple ceiling issues can promote more noise protection. If you’re in an area with noisy neighbors or children, you will love the insulation you get when your ceiling works correctly.
- Restore the Interior’s Look – With stucco ceiling repair, it’s easy to restore your home’s appearance. You picked that texture because of its uniqueness, but now it’s a mess. We can fix the problem so that it looks great again!
- Cost-effective – It’s easy for homeowners to put off ceiling repair jobs because it doesn’t look like a huge deal. However, you soon realize that it led to other problems, such as a sagging roof or leaks. Avoid those issues by handling the situation. Call us for assistance!
- Increases Home Values – Ceiling damage isn’t attractive for potential home buyers. They worry there could be significant roofing issues that you didn’t want to fix. Ceilings add character to your space, even if you’ve seen them a million times already!
Ceiling Installation
When searching for drop ceiling installation near Westminster, you’ve got many options. We’re the top choice, and this is a popular style, though it requires more work.
A suspended or acoustic ceiling resists moisture while improving the building’s insulation. If you install a drop ceiling, you could lower your energy bills throughout the year, which is a great advantage!
Often, this ceiling installation type requires knowledge and skill. We’re here to help you do it properly! Framing a drop ceiling requires an expert, and we can build the grid and install the drywall for you!
Ceiling grid installation is the first step. This helps us hang the ceiling tiles from the top to hide wiring and pipes. It’s excellent for homeowners without an attic and can save you money.
Generally, acoustic ceiling installation is excellent for many homeowners, and we can help you do it right!
Ceiling Texture
Did you know about the many ceiling texture types available to homeowners? Many of them are highly popular because you’re moving beyond that flat surface. Therefore, you’re adding ambiance and character to the area and can make it pop!
Ceiling texture is often used in living rooms, kitchens, and bathrooms. However, you may want it in your bedroom so that you’re not staring at a blank ceiling at night.
Most homeowners prefer a more modern ceiling texture and are shying away from popcorn ceilings. Options can include:
- Stippled – We create this using long-bristled brushes to make different shapes. You don’t get a smooth ceiling texture, but it offers an intricate design and is relatively easy to do.
- Skip Trowel – This texture ceiling style works well in many homes. We can create various designs with a trowel.
- Orange Peel – The orange peel style is one of the top ceiling textures out there. It adds dots to the ceiling and is less obtrusive and smaller compared to popcorn ceilings.
Garage Drywall
Installing drywall in a garage comes with many benefits, such as:
- Boost Resale Value – Buyers often like the idea of having a garage, but finishing garage drywall could get you a better deal. Everything is enclosed, and that’s a huge selling point.
- More Light – It’s easy to maximize the lighting in the space when you add garage drywall. The bright surface is more reflective!
- Noise Reduction – Garage drywall installation helps reduce noise. It’s not soundproof, but it can help if you use the space as a workshop or allow you to sit in the shade without listening to the neighbors.
- Fire Protection – Drywall for a garage ceiling is made with crystalized moisture in it. That makes it fire-resistant!
Give each garage wall an update and install drywall with our help!
Basement Remodeling & Finishing
Basement remodeling can be stressful because it can take time and patience to get the job done. However, having basement contractors will help alleviate that stress during your basement renovations. We will drywall your basement to be ready for the next step in your project.
Also, our team members are knowledgeable in many aspects of construction, so we will take care and be mindful of the other work that goes into your basement finishing.
Bathroom Remodeling
Bathroom remodeling is a long-term investment that can cost quite a lot of money. Therefore, it’s vital to hire professional bathroom contractors who can make your vision come to life. Not only will professionals ensure the structural integrity of your bathroom, but they'll also give your new bathroom that luxurious feel.
Installing new showers, bathroom vanities, and other utilities requires knocking down and building walls, electrical and plumbing work, and more. This is why it's best to leave the bathroom design and construction work to certified professionals who will comply with the necessary codes and regulations. When you work with our technicians, you can rest easy knowing all this will be taken care of.
Handyman Services
If your home or commercial premises is in dire need of maintenance or repairs, then it's important to find a handyman that you can trust.
A handyman can perform a wide range of tasks, from drywall repair and routine maintenance to more complex commercial handyman services. A trained technician can offer effective solutions to help you keep your space in tip-top condition without breaking the bank.
Whether you have a hole in the wall, a leaky faucet, or need to spruce up old plumbing, you can rely on our handyman repair services.
When you choose Allied Drywall Westminster, you can rest assured that you’re investing in a drywall handyman who is experienced, licensed, and insured for complete peace of mind!
Painting Services
Painting services are essential for achieving a flawless finish. Whether you need help with the interior or exterior of your residential or commercial property you can turn to Allied Drywall Westminster to get the job done right!
Our team of painters have many years of experience with projects in Westminster, Colorado, and will ensure that your surfaces are protected and looking their best with a fresh coat of paint.
Get Reliable Results with Us on Your Side
Whether you’re focused on sheetrock installation, removal, or repairs, it’s best to call the professionals to handle the job. When searching for drywallers near Westminster, we’re the ideal choice.
Call us now or use the online quote form to request assistance. Allied Drywall Westminster can help you with your drywall needs and are ready to assist!